Sunday, August 18, 2013

Why I couldn't make raspberry jam.

I couldn't make jam because of a few things like these: Oh and the pictures are from http://www.wikihow.com/Make-Red-Raspberry-Jam

1)  This huge bucket, like where can I possibly get this?

2)  This instrument, I don't even know what it is (stiff whisk apparently)

3)  This thermometer.

4)  I have never seen these jar thongs ever.


Written Report will be included as well.

So the written report will look like this:

according to https://www.ffa.org/documents/agsci_resource_guide.pdf

Written Report

Title Page -  The title page should include 
the title of your project, your name, grade, school and school address. This should be all that 
appears on this page. The title itself should be no more than three lines with a 15 word 
maximum. Any numbers, chemical elements and compounds should be spelled out. All words 
should be capitalized except for articles such as “a” or “the” and prepositions such as “of,” “in,” 
“on,” “during” and “between;” and conjunctions such as “and” and “but” unless they are the 
first word of the title.

Table of Contents

Abstract - a brief summary of your paper, which concisely describes your purpose, methods, 
results and conclusion. Do not include the title in the abstract. Your abstract may include 
potential research applications or future research. The abstract should not contain cited 
references. It should be no longer than one page and in paragraph form.

Introduction - In several paragraphs, 
provide background on your subject. The introduction should clearly state the problem that 
justifies conducting the research, the purpose of the research, the findings of earlier work and 
the general approach and objectives. You must cite sources for statements that are not common 
knowledge. The last paragraph of the introduction includes the objectives of the study.

Review of Literature - should detail to the reader what information currently exists concerning 
your research project. Information listed in your review should be materials that you have used 
for your research. 

Materials & Methods - Write in third person, in past tense, encompass all of the materials 
required and explain the technical and experimental procedures employed.

Results - Do not include discussion or conclusions about the data. Tell the reader 
exactly what you discovered and what patterns, trends or relationships were observed.

Discussion & Conclusion - draw conclusions from the results of your study and relate them to the original hypothesis. It is helpful to briefly recap the results and use them as a foundation for your 
conclusions. If your results were not what you expected, take this opportunity to explain why. 
Give details about your results and observations by elaborating on the mechanisms behind what 
happened.

Acknowledgements - Acknowledge anyone who helped in any aspect of your project in this section. 

Literature Cited 


Agriscience Research Project Requirements

So here is what my experiment board should include and all information came from https://www.ffa.org/documents/agsci_resource_guide.pdf

The board should be 36" in length and 48" in width.

Title: Put it in a question format. Make sure it is descriptive and interesting.

Purpose: This is a statement of the problem being investigated. What do you want to find out? Be specific, avoid generalities and vague statements.

Question: What did you want to solve?

Hypothesis: Should be an "If-then" statement. The hypothesis must directly reflect the problem being investigated.

Abstract: Your entire project summarized in one sheet of paper, with the font not less than 14/16 point.

Materials: List everything and quantity used. Show dimensions of materials in metric (SI) units.

Procedures: A step-by-step list of what you did. It must be detailed enough so that anyone could duplicate your experiment by following your procedures exactly. Remember... experiments must be repeatable.Number the steps with consecutive numbers.

Tables, Graphs, Photographs: Display visually what you did and what happened. Take pictures if at all possible. Graphs, tables, and charts are a must. Make sure all measurements are in metric (SI) units. This section should give a non-verbal representation of your project. A picture is worth a kilo (1,000) words!

Results: A summary of the observations you made during the experiment. Use both qualitative and quantitative observations. Discuss data you acquired during your experiment. This is not the place to draw conclusions about the experiment. This section is for strictly factual information based on your observations.

Conclusion: This is where you make conclusions based on your data. Was your hypothesis supported by the data? Explain any possible sources of error, uncontrolled variables, and problems you encountered. If your hypothesis was supported, say so. If not, say it wasn't and explain why this happened (based on data collected). Say what you have learned, what you might do differently, and apply your experiment to real world situations.

Applications: What will this project do to help the average farmer or food consumer?

NOTE: Photos w/ captions may be placed any place on the board. But they should show all stages of the experiment  and NO safety violations.

Data Book: The data book is a type of notebook (composition, spiral, etc.) that acts as a scientific journal. Record all observations in your data book. Record everything you do in your data book. This will be the source document for your project board.


Thursday, July 25, 2013

Just a brief

Have you ever planted something and wondered how it becomes something you end up eating? I took a Horticulture class for a semester and i planted many things, but i've always wondered how it becomes food. For example, my teacher worked side by side with my consumer foods teacher and while one planted seeds, the other would make some kind of food when the seeds grew. Trust me, the day when my teacher, Mrs.Oliver came in with a plate full of Focaccia, i was a happy girl because it was delicious. But once again, how? Anyways, for my raspberry jam or any type of jam experiment coming up in August, i've decided to manipulate the ingredients a bit. Instead of sugar, i would add brown sugar and see what changes or if the jam will even change.

Wednesday, July 24, 2013

A new idea!

Instead of plant breeding, i've decided to do something that involves cooking and garden grown fruits and vegetables. I think its called consumer science. Anyways, i'm thinking of making raspberry jam and then another raspberry jam with a few tweeks in the recipe. Pictures are to come in August maybe?

Here's the recipe found on http://www.yummly.com/recipe/external/Red-Raspberry-Jam-Martha-Stewart-191758. I'll further explain consumer science in my next post

Ingredients (yields 1)

  • 1 cup raspberries (fresh)
  • 25 oz pectin (powdered)
  • 12 tbsp lemon juice (freshly squeezed)
  • 158 cups sugar


DIRECTIONS

  1. STEP 1

    Place a round wire rack in the bottom of a large stockpot. The rack should fit as snugly as possible and should stand 1/2 to 1 inch above the bottom of the pot. Wash five half-pint jars, lids, and screw bands with hot, soapy water; rinse well. Stand the glass jars on the rack, and add the lids; it's not necessary to add the screw bands. Fill the pot with enough water to cover jars by 1 to 2 inches; an additional 1 to 2 inches of space should remain below the rim of the pot so the water doesn't overflow. Cover, and bring the water to a simmer (180 degrees.; let the lids and jars simmer 10 minutes. (The lids and jars can continue to simmer until you're ready to fill them.)
  2. STEP 2

    Using a wooden spoon, lightly crush raspberries in a large, heavy saucepan. Place the pan over high heat, and add pectin and lemon juice. Bring to a boil, stirring constantly. Slowly add sugar, stirring until dissolved. Return the mixture to a boil, and let cook for 1 minute. Remove from the heat.
  3. STEP 3

    Using a jar lifter, remove a jar from the simmering water, and empty the water back into the stockpot. Place the jar on a clean surface, and insert a canning funnel. Using a ladle, pour the jam through the funnel into the jar; fill to within 1/4 inch of the rim. Remove the funnel; wipe the rim with a clean, damp towel. Using the tongs, lift a lid from the hot water; place the lid, sealant side down, on the filled jar. Screw down the band, and tighten firmly, being careful not to force it. With the lifter, stand the filled jar in the simmering water. Repeat with the remaining jam and jars, making sure the jars aren't touching the sides of the pot and are spaced about 1 inch apart.
  4. STEP 4

    Raise the heat to high, cover the stockpot, and bring the water to a boil. Process the jars in the boiling water for 10 minutes. Remove the jars from the water bath with the jar lifter, and transfer them to a wire rack to cool for 24 hours. As the jam cools, a vacuum will form inside the jar, sealing it; you might hear a popping sound. A slight indentation in the lid indicates the vacuum seal; the lid should not flex up and down when pressed firmly with a finger. Store in a cool, dry, dark place for up to 1 year.

Wednesday, July 3, 2013

Is it the same thing?

Let's say I decided to use corn for my plant breeding experiment. Okay, so if i buy some corn from price right where the corn isn't peeled from its little green protection system, would it be the same as growing my own stem of corn?


Monday, July 1, 2013

Plant Breeding And All.

Okay, I've decided. I don't know which flower/plant to breed for many reasons. One of them being is that a bunch of lilies is expensive, i can't automatically plant corn and hope for some results in the next two months. If anyone has any suggestions, please, feel free to comment and tell me.

If i'm going to start breeding, i must know the basics. Oh yeah! The website which i summarized and got my information from is http://www.aces.uiuc.edu/vista/html_pubs/PLBREED/pl_breed.html

There are two types of plant selection: natural and artificial.
Here's a brief summary of each selection:

Natural: The process has taken place since the beginning of life on earth and is still occurring in nature. This process occurs in nature where strong and well adapted plants survive, compared to the weak and poorly adapted plants which die out.

Artificial: The process in which humans use to obtain desirable types of plants.

Two types of reproduction: sexual and asexual reproduction.

Sexual Reproduction: The most common type of reproduction for garden plants where the male and female germ cell unite and produce a seed. Most common because the plants originating from sexual reproduction differ from their parents and each other.

Asexual Reproduction: Also known as vegetative reproduction occurs without the fusion of male and female germ cells. Instead, a part of the plant is separated from the parent plant and then develops into a complete plant. For example, i actually did this in my Horticulture class. We cut the top of snake's tongue plant, and then planted it in a potted plant.

Parts of the Plant:
 This is a perfect flower, which contains the female and male organs, also known as the Stamen (male) and Pistil (female).

Plant anatomy isn't as awkward to talk about like it is hearing the male and female reproduction being taught in class. Back to the topic.

The Anther is a part of the Stamen, which produces pollen grains, which contain the male germ cells. At the base of the Pistil is the ovary, which as it produces ovules, contains the female germ cells. As the ovules are fertilized by the male germ cells, they develop into seeds in the ovary. Now onto whats outside the flower! The petals aid in pollination and protect the sex organs from physical damage. The sepals, which are often green, support the petals and protect the floral parts. The Stamens can be identified by the yellow powder a.k.a the pollen on their tips and the pistil by a bulge a.k.a the ovary at its base.

Types of flowers:

A perfect flower contains both the stamen and pistil (most common) and can be found as tomatoes, irises, and lilies.


An imperfect flower has only one sex organ. Examples of imperfect flowers are squash and spinach. 

 A composite flower is a cluster of small flowers a.k.a florets joined together in what is called a flower head. The florets resemble petals and some florets have both of the sex organs and are called disc florets. Unlike disc florets, ray florets only contain pistils. A composite flower can be made up of only disc florets or a combo of disc and ray florets. Examples are marigolds.
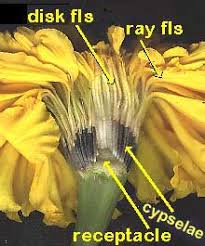

Pollination is the transfer of pollen from the anther to the stigma (the surface of the pistil on which pollen grains are deposited in the process of pollination).

The process of pollination: As the anther matures, it splits open, discharging the pollen. The pollen is carried to stigma by various natural means, such as wind and insects.

There are two kinds of pollen transfers: cross and self.

Cross pollination is where the pollen is transferred from the anther of one plant to the stigma of a flower of another plant.

Self pollination is where the pollen is transferred from the anther to the stigma of the same flower or to another flower of the same plant.

Fertilization is when two germ cells unite in the ovule.

The process of fertilization: After the pollen rests on the stigma, the pollen develops a tube which grows downward through the style (the usually elongated portion of the pistil connecting the stigma and ovary) and into the ovule, under favorable conditions. As fertilization occurs, development of the ovule begins, resulting in a seed.

Enough background for tonight, more coming up!